Monday, October 7, 2013

OSPF Virtual Links and Area Summarization

CCNPv6 ROUTE
Chapter 3 Lab 3-3, OSPF Virtual Links and Area Summarization

I purposed  this blog post for easy referencing who Labbing CCNP OSPF route .All Sources is according to CCNP lab manual . I'm also a learner who trying to get CCNP Certi . Cheer All bro .

Objectives


  1. Configure multi-area OSPF on a router.
  2. Verify multi-area behavior.
  3. Create an OSPF virtual link.
  4. Summarize an area.
  5. Generate a default route into OSPF.
Step 1: Configure addressing and loopbacks.

Step 2: Add interfaces into OSPF.

 Note: The default behavior of OSPF for loopback interfaces is to advertise a 32-bit host route. To ensure that the full /24 network is advertised, use the ip ospf network point-to-point command. Change the network type on the loopback interfaces so that they are advertised with the correct subnet.

 Step 3: Create a virtual link

Q : What would happen if routes could pass between areas without going through the backbone?
Ans :  Routing loops might occur because any route could get advertised to different areas. By passing through the backbone, type 3 LSAs are generated by their respective areas and not sent back in
 Q : When are virtual links useful?
Ans : Virtual links are useful when there needs to be a temporary extension of the backbone, either because the backbone became discontinuous or a new area got added onto an existing area. 
Q : Why are virtual links a poor long-term solution?
Ans : Virtual links are a poor long-term solution because they add processing overhead and basically extend the backbone area onto routers where it might not belong. They can also add a lot of complexity to troubleshooting.


Step 4: Summarize an area

 Loopbacks 100 through 103 can be summarized into one supernet of 192.168.100.0 /22.

Step 5: Generate a default route into OSPF. 

 You can simulate loopback 30 on R1 to be a connection to the Internet. You do not need to advertise this specific network to the rest of the network. Instead, you can just have a default route for all unknown traffic to go to R1. 


Use the following Tcl script to verify connectivity to all addresses in the topology

R1# tclsh
R1(tcl)#
foreach address {
10.1.1.1
10.1.2.1
10.1.3.1
10.1.12.1
10.1.12.2
10.1.23.2
10.1.23.3
172.30.30.1
192.168.100.1
192.168.101.1
192.168.102.1
192.168.103.1
} {
ping $address }


Challenge: Configure OSPF Authentication

Configure OSPF MD5 authentication on the link between R2 and R3, using key ID 1 and the password cisco. Record the commands used below.


Enter the following configuration commands on R2 and R3:
ip ospf authentication message-digest
ip ospf message-digest-key 1 md5 cisco


Final Configuration For Lab  and used c3725-advsecurityk9-mz.124-19b image for GNS 3 Lab

R1#sh running-config
Building configuration...
Current configuration : 1257 bytes

version 12.4
service timestamps debug datetime msec
service timestamps log datetime msec
no service password-encryption
!
hostname R1
!
boot-start-marker
boot-end-marker
!
no aaa new-model
memory-size iomem 5
ip cef
!
ip auth-proxy max-nodata-conns 3
ip admission max-nodata-conns 3
!
no ip domain lookup
ip domain name lab.local
!
interface Loopback1
 description Engineering Department
 ip address 10.1.1.1 255.255.255.0
 ip ospf network point-to-point
!
interface Loopback30
 ip address 172.30.30.1 255.255.255.252
!
interface FastEthernet0/0
 no ip address
 shutdown
 duplex auto
 speed auto
!
interface Serial0/0
 ip address 10.1.12.1 255.255.255.0
 clock rate 64000
!
interface FastEthernet0/1
 no ip address
 shutdown
 duplex auto
 speed auto
!
interface Serial0/1
 no ip address
 shutdown
 clock rate 2000000
!
router ospf 1
 log-adjacency-changes
 network 10.1.1.0 0.0.0.255 area 0
 network 10.1.12.0 0.0.0.255 area 0
 default-information originate always
!       
ip forward-protocol nd
!
no ip http server
no ip http secure-server
!
control-plane
!
line con 0
 exec-timeout 0 0
 privilege level 15
 logging synchronous
line aux 0
 exec-timeout 0 0
 privilege level 15
 logging synchronous
line vty 0 4
 login
!
end


 ======================================================

R2#sh running-config
Building configuration...

Current configuration : 1317 bytes
!
version 12.4
service timestamps debug datetime msec
service timestamps log datetime msec
no service password-encryption
!
hostname R2
!
boot-start-marker
boot-end-marker
!
no aaa new-model
memory-size iomem 5
ip cef
!
ip auth-proxy max-nodata-conns 3
ip admission max-nodata-conns 3
!
p domain lookup
ip domain name lab.local
!
interface Loopback2
 description Marketing Department
 ip address 10.1.2.1 255.255.255.0
 ip ospf network point-to-point
!
interface FastEthernet0/0
 no ip address
 shutdown
 duplex auto
 speed auto
!
interface Serial0/0
 ip address 10.1.12.2 255.255.255.0
 clock rate 2000000
!
interface FastEthernet0/1
 no ip address
 shutdown
 duplex auto
 speed auto
!
interface Serial0/1
 ip address 10.1.23.2 255.255.255.0
 ip ospf authentication message-digest
 ip ospf message-digest-key 1 md5 cisco
 clock rate 64000
!
router ospf 1
 log-adjacency-changes
 area 23 virtual-link 192.168.103.1
 network 10.1.2.0 0.0.0.255 area 0
 network 10.1.12.0 0.0.0.255 area 0
 network 10.1.23.0 0.0.0.255 area 23
!
ip forward-protocol nd
!
no ip http server
no ip http secure-server
!
control-plane
!
line con 0
 exec-timeout 0 0
 privilege level 15
 logging synchronous
line aux 0
 
exec-timeout 0 0
 privilege level 15
 logging synchronous
line vty 0 4
 login
!
end


=====================================================
R3#sh running-config
Building configuration...

Current configuration : 1739 bytes
!
version 12.4
service timestamps debug datetime msec
service timestamps log datetime msec
no service password-encryption
!
hostname R3
!
boot-start-marker
boot-end-marker
!
no aaa new-model
memory-size iomem 5
ip cef
!
ip auth-proxy max-nodata-conns 3
ip admission max-nodata-conns 3
!
no ip domain lookup
ip domain name lab.local
!
interface Loopback3
 description Accounting Department
 ip address 10.1.3.1 255.255.255.0
 ip ospf network point-to-point
!
interface Loopback100
 ip address 192.168.100.1 255.255.255.0
 ip ospf network point-to-point
!
interface Loopback101
 ip address 192.168.101.1 255.255.255.0
 ip ospf network point-to-point
!
interface Loopback102
 ip address 192.168.102.1 255.255.255.0
 ip ospf network point-to-point
!
interface Loopback103
 ip address 192.168.103.1 255.255.255.0
 ip ospf network point-to-point
!
interface FastEthernet0/0
 no ip address
 shutdown
 duplex auto
 speed auto
!
interface Serial0/0
 ip address 10.1.23.3 255.255.255.0
 ip ospf authentication message-digest
 ip ospf message-digest-key 1 md5 cisco
 clock rate 2000000
!
interface FastEthernet0/1
 no ip address
 shutdown
 duplex auto
 speed auto
!
interface Serial0/1
 no ip address
 shutdown
 clock rate 2000000
!
router ospf 1
 log-adjacency-changes
 area 23 virtual-link 10.1.2.1
 area 100 range 192.168.100.0 255.255.252.0
 network 10.1.3.0 0.0.0.255 area 23
 network 10.1.23.0 0.0.0.255 area 23
 network 192.168.100.0 0.0.3.255 area 100
!
ip forward-protocol nd
!
no ip http server
no ip http secure-server
!
control-plane
!
line con 0
 exec-timeout 0 0
 privilege level 15
 logging synchronous
line aux 0
 exec-timeout 0 0
 privilege level 15
 logging synchronous
line vty 0 4
 login
!

end


With Regards,
Zaw Min Htann


Friday, October 4, 2013

Multi-Area OSPF with Stub Areas and Authentication


CCNP Route Lab Manual  Lab 3-2, Multi-Area OSPF with Stub Areas and Authentication


Objectives

Configure multiple-area OSPF on a router.
Verify multiple-area behavior.
Configure OSPF stub, totally stubby, and not-so-stubby areas.
Configure OSPF authenticatio

Background

You are responsible for configuring the new network to connect your company’s engineering, marketing, and accounting departments, represented by loopback interfaces on each of the three routers. The physical devices have just been installed and connected by serial cables. Configure multiple-area OSPF to allow full connectivity between all departments.R3 also has a loopback representing a connection to another autonomous system that is not part of OSPF

Step 1: Configure addressing and loopbacks

Step 2: Add interfaces into OSPF

Step 3: Configure a stub area.

Q-What are the advantages of having a router receive a default route rather than a more specific route?
Ans: Router memory and processing are conserved because the router has fewer routes to contend with.

Q-Why do all routers in a stub area need to know that the area is a stub?
Ans - Routers need to know that an area is a stub for consistency so that no routers generate type 5 LSAs or other OSPF features (such as virtual links) in an area in which they cannot exist
.

Step 4: Configure a totally stubby area

Q-What are the advantages of making an area totally stubby instead of a regular stub area? What are the disadvantages?
Ans - By making an area totally stubby, routers in the area only see intra-area routes and a default route. This can save a lot of router memory and processor time. However, as with any type of route aggregation, the loss of routing detail makes it possible for a non-optimal route to be chosen.

Q- Why did only the ABR need to know that the area was totally stubby rather than all routers in the area?
Ans:The ABR is the gateway to the rest of the area and therefore is the boundary that all inter-area LSAs need to pass through. Because of this, it only needs to filter out the type 3 LSAs and let the default route through
.

Step 5: Configure a not-so-stubby area.

Q - Where would it be useful to make an area into an NSSA ?
Ans - An NSSA is useful if you want to allow an area to inject external routes into an OSPF domain while still retaining some of the stub characteristics of the area such as not accepting external routes that are originated in other areas


Step 6: Configure OSPF interface authentication

Q - Why is configuring authentication for OSPF, or any routing protocol, a good idea?
Ans - Configuring routing protocol authentication is beneficial because without it, you could have a rogue router on a subnet advertising false routes
.

Use the following Tcl script to verify connectivity to all addresses in the topology.
R1# tclsh

R1(tcl)#
foreach address {
10.1.1.1
10.1.2.1
10.1.3.1
10.1.12.1
10.1.12.2
10.1.23.2
10.1.23.3
172.20.200.1
} {
ping $address }


R1#sh running-config
Building configuration...

Current configuration : 1237 bytes
!
version 12.4
service timestamps debug datetime msec
service timestamps log datetime msec
no service password-encryption
!
hostname R1
!
boot-start-marker
boot-end-marker
!
no aaa new-model
memory-size iomem 5
ip cef
!
ip auth-proxy max-nodata-conns 3
ip admission max-nodata-conns 3
!
no ip domain lookup
ip domain name lab.local    
!       
interface Loopback1
 description Engineering Department
 ip address 10.1.1.1 255.255.255.0
 ip ospf network point-to-point
!       
interface FastEthernet0/0
 no ip address
 shutdown
 duplex auto
 speed auto
!       
interface Serial0/0
 ip address 10.1.12.1 255.255.255.0
 ip ospf authentication message-digest
 ip ospf message-digest-key 1 md5 cisco
 clock rate 2000000
!       
interface FastEthernet0/1
 no ip address
 shutdown
 duplex auto
 speed auto
!       
interface Serial0/1
 no ip address
 shutdown
 clock rate 2000000
!       
router ospf 1
 log-adjacency-changes
 network 10.1.1.0 0.0.0.255 area 0
 network 10.1.12.0 0.0.0.255 area 0
!       
ip forward-protocol nd
!       
no ip http server
no ip http secure-server
!               
control-plane
!              
line con 0
 exec-timeout 0 0
 privilege level 15
 logging synchronous
line aux 0
 exec-timeout 0 0
 privilege level 15
 logging synchronous
line vty 0 4
 login  
!             
end

R2#sh running-config
Building configuration...

Current configuration : 1396 bytes
!
version 12.4
service timestamps debug datetime msec
service timestamps log datetime msec
no service password-encryption
!
hostname R2
!
boot-start-marker
boot-end-marker
!
no aaa new-model
memory-size iomem 5
ip cef
!
ip auth-proxy max-nodata-conns 3
ip admission max-nodata-conns 3
!
no ip domain lookup
ip domain name lab.local
!
interface Loopback2
 description Marketing Department
 ip address 10.1.2.1 255.255.255.0
 ip ospf network point-to-point
!
interface FastEthernet0/0
 no ip address
 shutdown
 duplex auto
 speed auto
!
interface Serial0/0
 ip address 10.1.12.2 255.255.255.0
 ip ospf authentication message-digest
 ip ospf message-digest-key 1 md5 cisco
 clock rate 2000000
!
interface FastEthernet0/1
 no ip address
 shutdown
 duplex auto
 speed auto
!
interface Serial0/1
 ip address 10.1.23.2 255.255.255.0
 ip ospf authentication
 ip ospf authentication-key cisco
 clock rate 2000000
!
router ospf 1
 log-adjacency-changes
 area 23 nssa default-information-originate no-summary
 network 10.1.2.0 0.0.0.255 area 0
 network 10.1.12.0 0.0.0.255 area 0
 network 10.1.23.0 0.0.0.255 area 23
!
ip forward-protocol nd
!
no ip http server
no ip http secure-server
!
control-plane
!
line con 0
 exec-timeout 0 0
 privilege level 15
 logging synchronous
line aux 0
 exec-timeout 0 0
 privilege level 15
 logging synchronous
line vty 0 4
 login
!        
end

R3#sh running-config
Building configuration...

Current configuration : 1363 bytes
!
version 12.4
service timestamps debug datetime msec
service timestamps log datetime msec
no service password-encryption
!
hostname R3
!
boot-start-marker
boot-end-marker
!
no aaa new-model
memory-size iomem 5
ip cef
!
ip auth-proxy max-nodata-conns 3
ip admission max-nodata-conns 3
!
no ip domain lookup
ip domain name lab.local
!
interface Loopback3
 description Accounting Department
 ip address 10.1.3.1 255.255.255.0
 ip ospf network point-to-point
!
interface Loopback20
 description Connection to another AS
 ip address 172.20.200.1 255.255.255.0
!
interface FastEthernet0/0
 no ip address
 shutdown
 duplex auto
 speed auto
!
interface Serial0/0
 ip address 10.1.23.3 255.255.255.0
 ip ospf authentication
 ip ospf authentication-key cisco
 clock rate 2000000
!
interface FastEthernet0/1
 no ip address
 shutdown
 duplex auto
 speed auto
!
interface Serial0/1
 no ip address
 shutdown
 clock rate 2000000
!
router ospf 1
 log-adjacency-changes
 area 23 nssa
 redistribute connected subnets
 network 10.1.3.0 0.0.0.255 area 23
 network 10.1.23.0 0.0.0.255 area 23
!
ip forward-protocol nd
!
no ip http server
no ip http secure-server
!
control-plane
!
line con 0
 exec-timeout 0 0
 privilege level 15
 logging synchronous
line aux 0
 exec-timeout 0 0
 privilege level 15
 logging synchronous
line vty 0 4
 login
!
end

Monday, June 17, 2013

Boson Net Sim 8.0 For CCNP Certi Prepare

Today , i'm looking for some Net Sim for CCNP lab sim and founded that one called Boson
network simulator 8.0 .This software not Purpose for Certi Exam but it great for real world experience .It include all Lab Map and topology for CCNA and CCNP candidate  that can't be done by Packet Tracer and GNS 3 .GNS 3 is quite enough for Routing but not in Switching . So , i wanna share this software to all friends who prepare CCNP exam . Good Luck all bro !!!!!!!
Download link _ http://www.mediafire.com/download/xd61tf6gbxjuyym/Boson_NetSim_for_CCNP_v8.5.4689.18599(2).rar

Tuesday, May 7, 2013

အေဖာ္မြန္

ဘ၀ခရီးကို ေလွ်ာက္လွမ္းရာတြင္ သင့္အတြက္ အေဖာ္ေကာင္းတစ္ေယာက္ မရွိမျဖစ္
အစစ္အမွန္ လိုအပ္ေနသည္ဟု ဆိုပါလွ်င္ သင္ ၀န္ခံရေပလိမ့္မည္။ ဤအခ်က္ကို သင္
ျငင္းပယ္၍ မျဖစ္ေပ။ အေဖာ္ေကာင္းကို ရေအာင္ရွာလ်က္ သင္ႏွင့္အတူ
လက္တြဲေခၚေဆာင္သြားရလိမ့္မည္။ သူသည္…..
သင့္စိတ္ကို အင္အားျဖည့္တင္းေပးလိမ့္မည္။
သင့္ႏွစ္လံုးသားကို ေအးၿငိမ္းခ်မ္းသာေစလိမ့္မည္။
သင့္မ်က္ႏွာတြင္ ၾကည္လင္ေသာအျပံဳးကုိ ျဖစ္ထြန္းေစလိမ့္မည္။
သင့္ဣေျႏၵကို တည္ၿငိမ္ရင့္က်က္ေစလိမ့္မည္။
သင့္မ်က္လံုးမ်ားမွာ က႐ုဏာျပည့္လႊမ္းေစလိမ့္မည္။
သင့္ႏႈတ္ခမ္းကို ယဥ္ေက်းခ်ိဳသာေစလိမ့္မည္။
သင့္နားထဲမွာ ဥေပကၡာတရား ျဖန္႕ၾကက္ေပးထားမည္။
သင့္လက္မ်ားကို ေမတၱာတရား ျပည့္၀သြားေစမည္။
သင့္အျပဳအမူမ်ားကို သိမ္ေမြ႕ႏူးညံ့ေစလိမ့္မည္။
သင္ေလွ်ာက္လွမ္းေနေသာ ခရီးလမ္းတြင္ ၾကံဳေတြ႕ရသည့္ အခက္အခဲဟူသမွ်
သတိသမၸဇဥ္ အသိဉာဏ္ယွဥ္ကာ ကူညီေျဖရွင္းေပးလိမ့္မည္။
ခရီးဆံုးပန္းတိုင္သို႔ လ်င္ျမန္စြာ ေရာက္ရွိေအာင္လည္း
သင့္အားေဆာင္ၾကဥ္းသြားလိမ့္မည္။
ဘယ္ေလာက္မ်ား ေကာင္းလိုက္ပါသနည္း။
ဤအတိုင္းသာ ျဖစ္လွ်င္ သင္သည္ သူ႕ကုိ အလိုရွိအပ္၏။ သင္သူ႕ကို
အလိုရွိမည္ဆိုပါက သင္ႏွင့္အတူ
သူ အျမဲေနေပလိမ့္မည္။ ဘ၀လြတ္ေျမာက္ေရးကို အမွန္တကယ္ ရလိုပါလွ်င္ သူသာပင္
သင့္အတြက္ အေကာင္းဆံုးခရီးေဖာ္ ျဖစ္၏။
သူ႕ကို အားလံုးက “သည္းခံျခင္း” ဟု ေခၚၾကသည္။

Per-Vlan Spanning Tree Behavior

က်ေနာ္ လုပ္ျဖစ္ေနတဲ့ CCNP switch Lab Manual ထဲက Lab မ်ားကုိ ေဖာ္ျပထားျခင္း ျဖစ္ပါတယ္..
အေျခခံ အဆင့္ေတြမုိ ့ beginner ေတြ  အတြက္ပဲ ရည္စူးျပီး တင္လုိက္ျခင္း ျဖစ္ပါတယ္ ခင္ဗ်.

Objective - Observe the behavior of a separate spanning tree instance per Vlan

- Change spannning tree mode to rapid spanning tree

Step 1: Perpare the switches for the Lab .
all active switches ports go to trunk mode with dot1q encapsulation
Note: the default mode on a 3560 or 2960 is dynamic auto , the default mode on a 3550 or 2950 is dynamic
desirable
Step : 2 Configure VTP
configure all switches with vtp mode transparent and domain u want .
Step : 3 Assign a root switch for each vlan
Setp : 4 Configure RSTP
Other Spanning tree mode besides PVST+ are avalible . One of these is RSTP ( Rapid Spanning tree Protocol)
which greatly reduce the time for a port to transition to forwarding state while still preventing bridging loops.
Cisco-Proprietary Per-Vlan rapid spanning tree ( PVRST+) combines the functionality of RSTP and PVST.

Note: use Clear spanning-tree detected-protocols command after configuring different spanning tree mode.

Challange
added more vlans and configure root bridge for ALS1 and ALS2 .
change the cost of vlan between DLS1 and DLS 2 .
everything can run on packet tracer and GNS 3
Cheer !!!!!! all bro

Thursday, April 18, 2013

Modifying Default Spanning tree Behavior


ဒီ Lab ကေေတာ့ Cisco Networking Academy ရဲ ့ CCNP Switch Lab Manual ထဲကပါ. ဒီစာအုပ္က Cisco က ထုတ္တဲ့ Official Press မုိ ့ real field နဲ ့ပုိမုိနီးစပ္မယ္လုိ ့ထင္ျမင္မိပါတယ္ တခ်ဳိ ့ စာဖတ္ရင္းနဲ ့ မရွင္းတဲ့ အေၾကာင္းအရာတစ္ခ်ဳိ ့ကုိ  Lab လုပ္ရင္းနဲ ့ နည္းနည္းသိလာတာမ်ဳိးရွိပါတယ္..အဓိက ကေတာ့ real world မွ တကယ္လုပ္ကုိင္ ရင္းႏီွးေနဖုိ ့လုိမယ္ ထင္
ပါတယ္ ... ကုိယ္နားလည္သေလာက္ သိသေလာက္ နည္းနည္းေလး ေရးထားတာမုိ ့ အကုိ CCIE မ်ား NP မ်ားက လုိအပ္တာ မ်ားကို ေ၀ဖန္ေထာက္ျပ ပညာေ၀မွ်ၾကဖုိ ့ေမွ်ာ္လင့္ပါတယ္.......
Che
er all Myanmar Cisco bro !!!!!!!!!!!!|

Modifying Default Spanning tree Behavior

Step 1: Prepare the switch for the Lab.

Step 2: Display Default Spanning Tree information For all swtichesa
by using # show spanning-tree
#sh int tru

Step 3:Configure Specific switches to be primary and secondary root
# ဒီေနရာမွာ packet tracer နဲ ့ဆုိရင္ေတာ့ debug command ကုိ သုံးလုိ ့မရပါဘူး..
ေနာက္ျပီးေတာ့ | နဲ ့ filter လုပ္ျပီးေတာ့ ၾကည့္လုိ ့မရတာကလြဲ ရင္ က်န္တာအားလုံး အဆင္ေျပပါတယ္

Step 4: Change the root port using the spanning-tree port-priority command
Port Priorities range from 0 to 240 , increments of 16 . the default priority is 128.
ဒီကေနျပီးေတာ့ တန္ဖုိးေျပာင္းလဲျပီး ၾကည့္ပါတယ္.

Step 5: Configure Portfast on an access port

Step 6 : Change root Port using the spanning-tree cost command

အဆင့္ ၆ ခုပဲ ပါပါတယ္.. Lab manual ebook ကုိလဲ 4 shared မွာ ရနုိင္ပါတယ္..
သိသေလာက္ လုပ္ထားသေလာက္ပဲ တင္လုိက္တာပါ..

Saturday, April 21, 2012

Fuzzy Logic and Set Theory

ဒီေနရာမွာ Classical Set နဲ ့ fuzzy Set တုိ ့ရဲ ့ မတူျခားနားမႈကုိ ေဖာ္ျပထားပါတယ္…


Classical Set ကုိ 

(၁)     Operation on Classical Sets
(၂)     Properties of Classical (Crisp) Sets
(၃)     Mapping of Classical Set to functions ဆိုျပီး ခြဲျခားေဖာ္ျပပါတယ္..

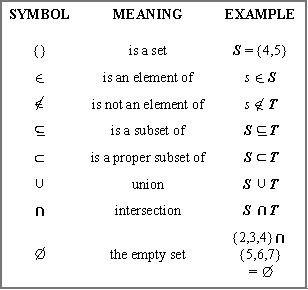
 ဒါကေတာ့ Set Theory မွာသုံးတဲ ့ Symbol အခ်ဳိ ့ပါ.


Fuzzy sets ကုိေတာ့

(၁)     Fuzzy Set Operations
(၂)     Properties of Fuzzy Sets ဆုိျပီး ခြဲျခားေဖာ္ျပထားပါတယ္..
ေနာက္ထပ္သိထားသင့္တဲ့ တစ္ခုကေတာ့ Sets as Points in Hypercubes ပါ….

Classical Set ဆုိတာကေတာ့ ထာ၀ရအမွန္တရားလုိ ့ လက္ခံထားတဲ့ အရာမ်ား (A universe of discourse) .လုိ ့ ဆုိ ပါတယ္…ကၽႊန္ေတာ္တုိ ့ X ကုိ မူေသထားတဲ ့ ကိန္းဂဏန္းမ်ားလုိ ့ ဆုိပါရေစ…သိျပီးသားအေၾကာင္းမ်ားကိုေတာ့ ျပန္ေရးမေနေတာ့ပါဘူး..
အမွန္တရား လက္ေတြ ့အသုံးခ် အသုံးျပဳေနတဲ့ ကိန္းဂဏန္းအစုေပါ့.. ..ဆုိပါေတာ့..
ကြန္ျပဴတာ clock speed လုိ ..ေမာ္တာ တစ္လုံးရဲ ့ ေမာင္းနွင္စြမ္းအင္( operating current) လုိ..ငလ်င္လူပ္တဲ့အခါ တုိင္းတဲ့ မကၠနီက်ဳ ့ ( Richter Magnitude ) လို …ေနာက္ ၁ အစ ၁၀ အဆုံး ကိန္းစစ္(integer) လုိ အစုေတြပါ..လက္ေတြ ့အသုံးခ်ေနတဲ့ အင္ဂ်င္နီယာလုပ္ငန္းအမ်ားစုမွာ အသုံးျပဳေနတာ အဲသလုိ ကိန္းဂဏန္းအစုေတြပါ…Set ဆိုတာကုိ အားလုံးသိျပီးသားမုိ ့ အရွည္ေျပာစရာလုိမယ္မထင္ေတာ့ပါဘူး…
Operations of Classical Set ဆုိတာကုိ အေျခခံအားျဖင့္ ေလးမ်ဳိး ခြဲျခားနုိင္ပါတယ္…အဲဒါေတြကေတာ့
Union A ∪ B = {x | x ∈A or x ∈ B}
Intersection
Complement
Difference (A ∪ B) \ (A ∩ B) စတာေတြ ျဖစ္ပါတယ္..

 Basic Set Theory

 fig : Difference between Classical Set and Fuzy set

ဒါေတြကေတာ့ အားလုံးသိျပီးသားေၾကာင္းအရာမ်ားပါ..လွ်ာ၀င္ရွည္ေနတယ္လုိ ့မထင္လုိက္ပါနဲ ့..
ေနာက္တစ္ခုကေတာ့ Properties of Classical ( Crisp) Sets ပါ .
အဲဒါေတြကေတာ့ Commutativity, Associativity, Distributivity, Idem potency, Identity ,Transitivity ,Involution စသည္ စသည္တုိ ့ျဖစ္ၾကပါတယ္...
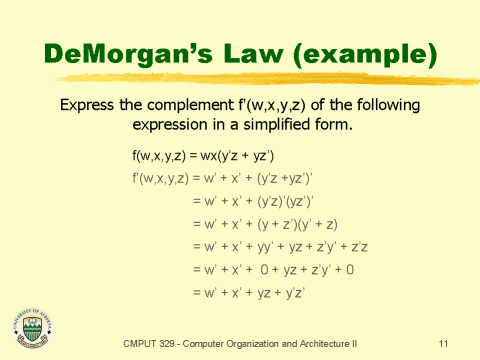
ေနာက္ Classical Set Operation ေတြမွာ အသုံးမ်ား လူသိမ်ားတဲ့ excluded middle laws နဲ ့ De Morgan’s Laws တုိ ့့ျဖစ္ၾကပါတယ္…
Law of the Excluded Middle မွာကုိ နွစ္ခုျပန္ကြဲပါတယ္...တစ္ခုကေတာ့ excluded middle laws ပုံစံနဲ ့ ေနာက္တစ္ခုကေတာ့ Nurr Set လုိ ့ ေခၚတဲ့ Law of the contradiction တုိ ့ျဖစ္ပါတယ္...


 Excluded Middle Law ကုိ ေက်ာင္းသားတစ္ေယာက္ လက္ေတြ ့အသုံးခ်ေနပုံ


ကၽႊန္ေတာ္တုိ ့ မင္းသားၾကိးျဖစ္တဲ့ De Morgan ကေတာ့ တတိယနွစ္ကေလာက္ေန စျပီး ပါမယ္ထင္ပါတယ္…ေနာက္ဆုံးဘိတ္ ME course work ထိ သူ ့ရဲ ့အေျခခံ သေဘာတရားေတြ ပါေနဆဲပါ... 


Classical Set နဲ ့ပက္သက္ျပီး ေနာက္ဆုံးတစ္ခုကေတာ့ Mapping of Classical Set of Functions ပဲျဖစ္ပါတယ္..သူကေတာ့ ျပင္ပေလာကကုိ  သီအုိရီနဲ ့ခ်ိတ္ဆက္တဲ့ေနရာမွာ အေရးၾကီးတဲ ့ အယူအဆပုိင္းဆုိင္ရာ အေၾကာင္းအရာျဖစ္တယ္လုိ ့ ဆုိပါတယ္..
X နဲ ့ Y လုိ မတူညီတဲ့ ဒုိင္ေမးရွင္းနဲ ့ universe of discourse ကုိ တြက္ခ်က္ပါတယ္…Mapping မွာ operation of Classical Set ေတြက ပုံစံေျပာင္းသြားပါတယ္ ..

ၾကဳံရင္းဆက္ေရးပါဦးမယ္..
ေလးစားမႈျဖင့္ 
ေမာင္ထန္းၾကီး